Space vegetables in a raised bed by starting with the actual crop and variety, reading what each spacing instruction means and marking a layout you can reach. The bed’s wooden or metal boundary does not give every plant the same mature footprint.
Work from the usable inside dimensions, then account for supports, access and the harvest you intend. Keep the calculation separate from any promise of a particular yield.
You do not need one universal plant-per-square-foot chart to make a useful plan. You need crop-appropriate instructions and a drawing that translates them accurately into the space you have.
Measure the growing area you actually have
Measure the inside length and width rather than copying the outside product dimensions. Note any internal feature, taper or section that will not be planted so that your sketch represents usable growing space.
Draw the surrounding paths and mark which sides you can reach. A bed against a fence creates a different access problem from one surrounded by clear paths, even when both have the same interior dimensions.
Include permanent supports and irrigation components that already occupy the bed. You should not discover after planting that the only place for a required support is now occupied by another crop.
Keep any structural or load question separate from plant placement. This guide describes a planting layout, not the construction or safe loading of an elevated planter.
Read the exact spacing instructions
Start with the seed packet or transplant tag for the crop and variety. Copy the full instruction, including whether it describes seed placement, final plant spacing or the distance between rows.
UF/IFAS advises against guessing on sowing depth and spacing and directs gardeners to crop guidance when the packet is incomplete. Use the same approach rather than filling a missing number with a spacing borrowed from another vegetable.
Distinguish the initial sowing pattern from the final pattern after thinning. A dense row of newly emerged seedlings is not necessarily the intended arrangement for mature plants.
If a packet supplies more than one spacing option, read what each option is for. A crop harvested as small leaves can involve a different plan from the same crop grown to a larger harvest stage.
Keep the growing method attached
NC State’s small-space vegetable guide provides crop-specific spacing information alongside growing context. Its different entries illustrate why a single distance should not be assigned to every vegetable in a compact garden.
Do not combine the smallest values from unrelated systems and call the result an improved raised-bed plan. Compare instructions written for the actual crop, harvest goal and growing arrangement you intend to maintain.
A row-spacing instruction may include room associated with that row system, but do not delete it automatically without understanding the recommendation. If you want to use a different planting pattern, find guidance that supports that pattern.
When sources differ, ask a local Extension service about the specific crop and intended harvest. Bring the packet and your bed sketch so that the question concerns a real arrangement rather than a theoretical spacing debate.

Translate a chosen distance into marked positions
Once you have an appropriate instruction, identify what the measurement runs between. If the guidance specifies plant centers, mark the future center of each plant rather than measuring an arbitrary gap between today’s small leaves.
Use temporary markers to show the proposed positions before you put plants in the ground. This lets you inspect the arrangement from the path and correct a measurement without repeatedly moving transplants.
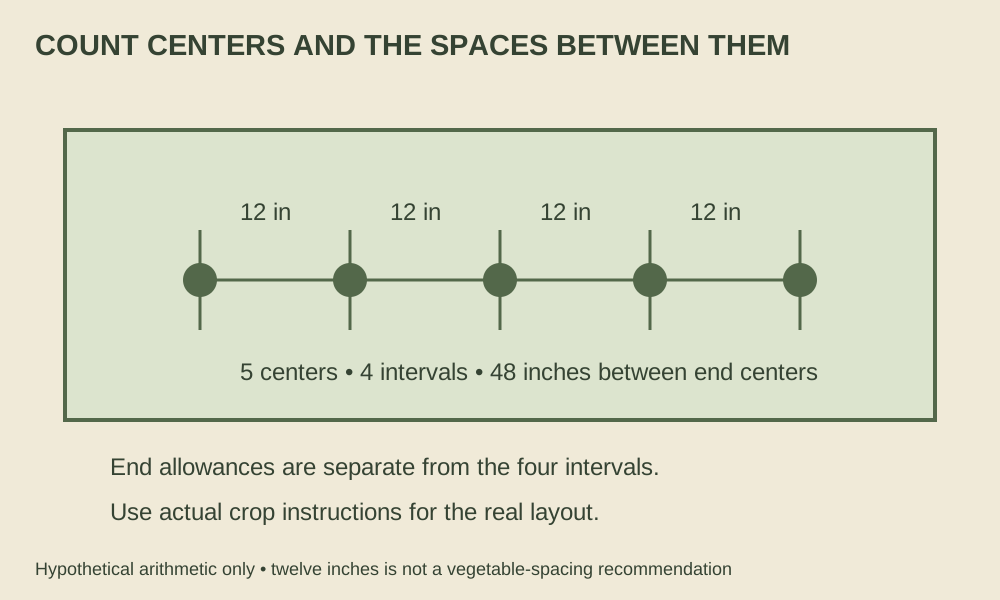
For an original geometry example, a straight row of five marked centers at twelve-inch intervals spans forty-eight inches between the first and last center. The space beyond those end centers is a separate part of the layout, not included in the four intervals.
Those numbers illustrate interval counting only, not a recommendation for a particular vegetable. Use the actual spacing and edge requirements appropriate to your crop when you make the real marks.
Check the mature arrangement
Sketch the expected growth habit using the variety information rather than the size of the starter pot. A small nursery container does not mean that the plant above it will remain compact.
Mark the location and access needed for supports that the crop will use. If you plan to train a plant, include the appropriate support system and its instructions instead of assuming vertical growth eliminates all horizontal space needs.
Look at which neighboring plants and paths will be affected as growth fills the bed. This is a practical access check, not a guarantee that an imagined outline predicts every leaf.
If the mature arrangement leaves no workable harvest route, reduce the count or revise the crop choice. Do not preserve a numerical target by assigning yourself a season of reaching through plants from an unstable position.
Plan thinning when you plan sowing
Iowa State includes thinning to a uniform spacing among the tasks of direct seeding. Keep that later task on your plan instead of treating the initial sowing as the completed layout.
Save the packet’s thinning instructions and mark the row so that you can identify it afterward. If you cannot distinguish crop seedlings from other growth, obtain help before removing plants at random.
Check the final arrangement after thinning rather than assuming that removing a few seedlings creates the intended distances. Record any section that ended up different so that future comparisons use what actually grew.
A transplant layout needs a similar final check. Confirm the variety labels and marked positions before planting the whole group, particularly when several purchased starts have similar-looking leaves.
Count positions before carrying out the plants
Use the temporary markers to count actual positions, including the first and last plant, rather than dividing the total bed length by a spacing number and stopping there. End allowances and the way you orient rows affect which positions are available.
In the hypothetical five-center example, the four intervals describe the distance between centers only. If a bed interior were exactly forty-eight inches long, the example would leave no distance between either end center and its adjacent bed wall, which may not suit the real crop.
Draw that situation before deciding whether another plant fits. Add the actual edge requirements and usable area for your chosen crop, then adjust the number of positions instead of squeezing the markers closer together to preserve the original count.
For more than one row, check the spacing across rows as well as along them. A tidy row of markers can still produce an unsuitable pattern if neighboring rows have been placed without a crop-appropriate distance between their plants.
The arithmetic should support your selected growing instructions. It should not become a reason to override them merely because the result looks more efficient on graph paper.
Allow for changes without crowding
If one planned plant is unavailable, evaluate the replacement’s requirements before putting it into the same marker position. A different growth habit or harvest stage may change more than the name on your drawing.
Likewise, an empty patch is not automatically room for another full-size plant. Check the surrounding crop’s intended mature area before using a temporary gap as a permanent new position.
For example, you may decide to leave a gap visible until you have crop-specific guidance for an additional planting. That is a deliberate layout choice, not wasted space that must be filled immediately.
Record the final planted count, actual pattern and any later changes. Your finished plan should explain how the crop instructions became reachable positions in the bed, giving next season’s spacing decision a useful starting point.