A raised bed is easier to move while it is still a sketch. Before you order boards, metal panels, or a load of soil, spend some time finding out how the space works through an ordinary day.
You are choosing more than a sunny rectangle. You need a place where your crops, watering route, access, and household routine can work together without turning every small task into a workaround.
Begin with the crops you actually want
Write down a short list of vegetables you would be happy to tend and eat. Three crops with a clear purpose give you a more useful starting point than an ambitious list copied from someone else’s garden.
University of Minnesota Extension suggests six to eight hours of sunlight for full-sun crops such as tomatoes, peppers, and eggplants. The same guide distinguishes crops that can use shadier conditions, so do not treat every vegetable as having identical needs.
Use the intended crop as the reason to examine the site. If tomatoes are your main goal, a convenient but heavily shaded corner needs a different plan than a space with suitable direct sunlight.
You can change the crop list before changing the yard. This gives you a chance to fit the garden to a real space instead of building an expensive bed and then searching for something that tolerates it.

Observe sunlight instead of naming a sunny spot
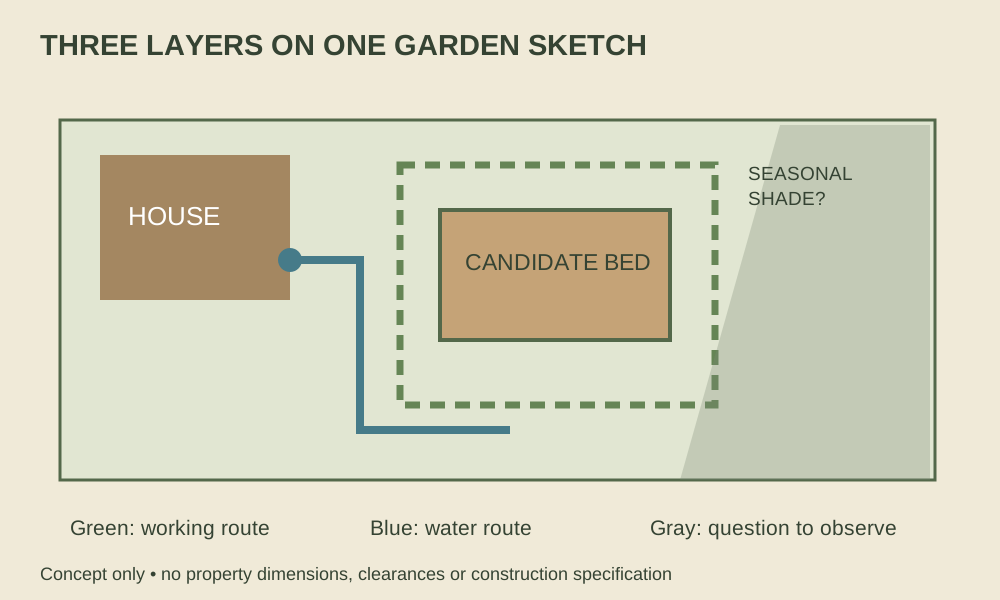
Pick two or three possible locations and make a simple observation record. Note when direct light reaches each space and when the house, fence, or trees cast shade over it.
University of Florida’s site-selection guidance asks you to consider seasonal changes in the sun and surrounding landscape. A winter observation under bare branches cannot settle how a summer vegetable bed will be shaded.
You do not need a polished drawing to begin. A sheet with morning, midday, and afternoon notes can show which candidate deserves a closer look.
Keep uncertainty visible in the record. Write “summer tree shade not yet observed” rather than turning a guess into a permanent design assumption.
Walk the watering route
Go from the water source to each proposed location with the route in mind. Think about gates, steps, corners, and the space that a hose or watering can will occupy.
The Florida guidance recommends a convenient location near the house and a water source. For your own plan, turn convenience into a practical question: can you water without dragging equipment across the place where everyone walks?
If a gate must close during watering, account for that before placing the bed. If you use a can, consider the number of trips you are prepared to make when it is full.
Use your existing routine as evidence. A garden you pass every day makes it easier to notice a dry seedbed or a damaged plant than one hidden behind a seldom-used shed.
Watch the area after rain
A raised frame does not remove the need to understand the ground beneath it. Observe where water collects, where it moves, and whether a candidate sits in a persistent low spot.
Rutgers Extension recommends good drainage and avoiding standing water when choosing a vegetable garden site. Treat recurring pooling as something to investigate before filling the space with a bed.
Record what you can actually see rather than diagnosing the soil from one photograph. A damp patch, a downspout outlet, and a footpath carrying runoff are different clues that may need different attention.
Do not redirect water onto neighboring property or cover an unresolved drainage problem as part of a casual garden project. If the site’s behavior is unclear, get local advice before committing to a permanent structure.
Try the working space at full size
Mark the proposed outline with a removable method that is safe for the surface and household. Then walk around it carrying the tools or container you would normally use.
Leave room for the work rather than only the frame. You may need to kneel, reach, turn, move a cart, or help another person without stepping into the growing area.
Test access from the sides you can actually use. A bed beside a fence may look reachable on paper but leave the far corner awkward once plants and supports fill the space.
Consider future plant size as well as the empty bed. A mature crop or trellis can change the path, the reach, and the shade cast onto a neighboring growing area.
Check the site’s history and restrictions
Find out what you know about the ground, prior uses, and any existing structures before making it a food-growing space. A raised bed and purchased fill should not become an excuse to ignore a questionable site history.
Ask your local Extension office how to approach soil testing and any concern about contamination. A routine fertility test and a test for a specific contaminant are different questions.
If you rent or live under association rules, confirm that the location and structure are allowed. Check required clearances and avoid blocking utilities, drainage access, doors, or other functions of the property.
Before any digging or ground anchoring, use the appropriate local utility-location process. A small garden plan does not tell you where a buried line is located.
Compare candidates with a simple decision sheet
Give each location a row and record the crop fit, observed sunlight, water route, drainage observations, and usable access. Use plain descriptions instead of invented numerical scores that make uncertain details appear precise.
You might find that the sunniest corner has an awkward watering route while a nearer location suits a different crop. That is a real tradeoff you can discuss before choosing the bed’s size and materials.
Keep a separate column for questions still needing answers. A short list such as “summer shade, permission, and soil history” is more actionable than a vague feeling that one location is probably fine.
Choose a first-season layout you can maintain comfortably. Leaving space unused is often easier to revise than discovering that every route is crowded by a larger initial build.
Make the location decision part of your garden notebook
Consider what a normal harvest trip will look like before settling the final position. If you usually cook after work, walk the route at that time and notice whether the gate, path lighting, and places to set a basket fit your routine.
Think about who else uses the yard and what needs to remain accessible. A bed beside a children’s play route, a frequently used gate, or a lawn-care path can introduce a conflict that a sunny photograph will not reveal.
If two locations remain plausible, decide what observation would separate them. You might need a summer shade check, a clearer view after a substantial rain, or a practical test carrying the watering equipment you already own.
Keep the next purchase tied to the answer rather than the other way around. A sale on a large kit is not a reason to ignore the access and care constraints you have just documented.
You can leave the second location marked on the sketch without building it this season. That gives next year’s planning a useful starting point while keeping this year’s work within the space and attention you are ready to provide.
Save the sketch, observations, and reasons for the choice. Include the crop list and the questions you resolved so you do not have to repeat the whole exercise when you add another bed.
Set a reminder to observe the area again when the season changes. The first year’s notes can show what the original layout missed without turning every adjustment into a failed project.
Once you have chosen the site, move to the bed construction and soil decisions using guidance for the actual materials and your location. Those are separate steps with their own requirements.
For the watering routine, use our soil-and-plant observation guide. A sensible location makes daily care easier, but you still need to check what the garden needs as it grows.